Proper lab bench maintenance involves daily surface cleaning with neutral detergents, material-specific care protocols for epoxy resin, phenolic resin, stainless steel, and natural stone, routine hardware inspections, and a structured repair-versus-replace decision framework. A consistent maintenance schedule extends bench service life and reduces unplanned replacement costs.
Lab benches take a sustained beating. Acid spills, solvent exposure, heavy equipment loads, and daily cleaning cycles all degrade surfaces and structural components over time. For lab managers and facility teams, the question is rarely whether a bench will show wear—it’s whether that wear gets caught early enough to manage affordably.
This guide covers every layer of lab bench maintenance: daily cleaning routines, deep cleaning methods, material-specific care for the four most common worktop types, hardware and frame upkeep, and a structured framework for deciding when to repair and when to replace. A maintenance checklist and FAQ are included at the end for quick reference.
The information applies to all common lab bench and workstation configurations—freestanding, wall-mounted, island, and peninsular—regardless of construction material.
Daily Cleaning Routines for Lab Benches
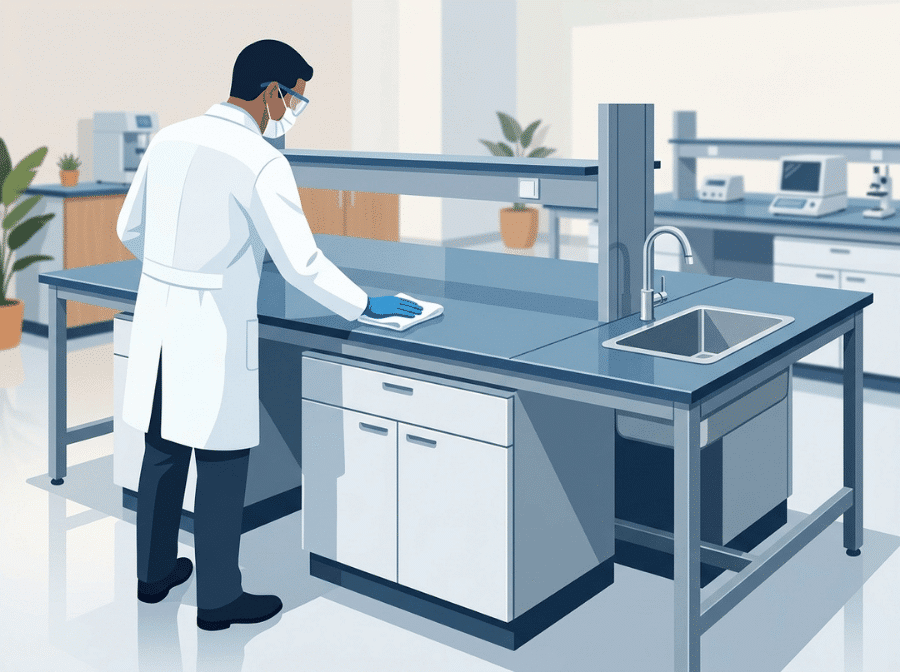
Why should lab benches be wiped down after every experiment?
Residual reagents, biological material, and particulates left on a bench surface don’t stay inert. Depending on the chemistry involved, they can continue reacting with the worktop material, attract contamination, or create a hazard for the next user. A wipe-down after each experiment session removes active residues before they cause measurable damage.
Use a damp cloth or disposable wipe suited to the surface material. Work from clean areas toward contaminated zones to avoid spreading residues across the bench.
What types of cleaning products are safe for lab bench surfaces?
Neutral pH detergents—typically in the pH 6–8 range—are appropriate for routine cleaning across all common lab bench worktop materials. Strongly alkaline cleaners (such as bleach at high concentrations) and strongly acidic cleaners can degrade surface finishes, particularly on epoxy resin and phenolic resin worktops, when used repeatedly at full strength.
Avoid spray bottles that create aerosols near open samples or sensitive instruments. Apply cleaning solution to the cloth, not directly to the bench surface.
How should chemical spills on lab benches be handled safely?
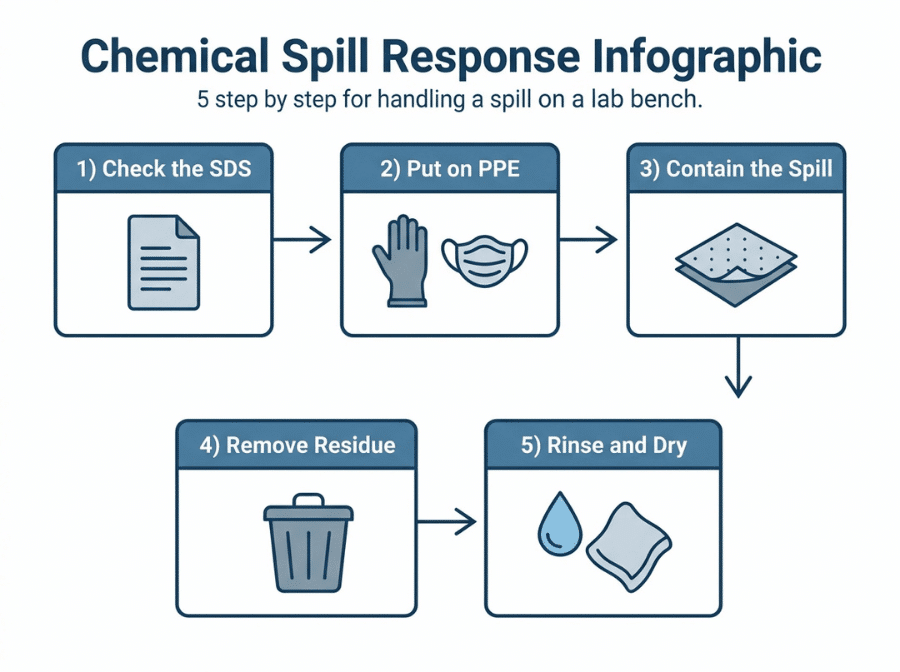
The correct response to a chemical spill depends on the substance involved, but a general protocol applies in most cases:
- Consult the relevant Safety Data Sheet (SDS) before touching the spill if the substance is unknown or hazardous
- Don PPE appropriate to the chemical class
- Contain the spill using absorbent pads or neutralizing agents where specified
- Remove the residue promptly and dispose of it according to local hazardous waste protocols
- Rinse the surface with clean water and dry thoroughly
Do not leave spill residues to air-dry on the bench. Some compounds, particularly strong acids and oxidizers, can etch or discolor a surface within minutes of contact.
Why does drying the bench surface matter after cleaning?
Standing water accelerates corrosion on steel frames, causes swelling in wood-framed casework, and can work into seams and joints over time. After wet cleaning, dry the surface with a clean cloth before resuming use. This step is especially important around sink cutouts, cable grommets, and edge banding where water can penetrate the worktop substrate.
Deep Cleaning and Stain Removal Techniques
How do you identify a stain on a lab bench before treating it?
Applying the wrong treatment to a stain can make it worse or damage the surface. Before selecting a cleaning agent, identify the likely source:
- Yellow or brown discoloration: Often caused by tannin-based reagents, iodine, or oxidized organic material
- White haze or deposits: Typically mineral scale from hard water or alkaline reagents
- Dark gray or black marks: May indicate metallic contamination, mold, or carbon residue
- Surface dulling without visible staining: Often caused by repeated exposure to solvents or abrasive wiping
When in doubt, test any cleaning agent on a small, inconspicuous section of the bench before applying it to the full stained area.
What solvents are appropriate for removing organic grime from lab benches?
For organic stains—grease, oil, polymer residues, and similar deposits—isopropanol (IPA) at 70% concentration is a reasonable starting point for most worktop materials. It is effective, low-toxicity, and evaporates cleanly. For more persistent organic grime, acetone may be used on epoxy resin and stainless steel surfaces, but should be avoided on phenolic resin, which can be damaged by prolonged solvent exposure.
Apply the solvent to a cloth rather than pouring it directly onto the bench, and ventilate the area adequately during use.
How do you remove mineral deposits and etching marks from lab bench worktops?
Mineral scale from hard water or calcium-containing reagents can typically be loosened with a dilute solution of white vinegar (acetic acid) or a commercial descaling product. Apply the solution, allow it to dwell for several minutes, then wipe clean and rinse with water.
Etching—where the surface has been chemically altered, not just stained—cannot be reversed by cleaning. Light etching on epoxy resin may be partially reduced by professional resurfacing; deeper etching generally indicates the area has been compromised and should be documented for the damage log.
Why should abrasive pads be avoided on lab bench surfaces?
Abrasive pads (steel wool, scouring pads, high-grit abrasive sponges) scratch the protective surface layer of all common lab worktop materials. Once scratched, surfaces trap contaminants more readily, become harder to decontaminate, and—on materials like epoxy resin—may lose some of their chemical resistance at the damaged site. Use soft cloths, microfiber wipes, or nylon-bristle brushes for any scrubbing action required.
Material-Specific Care Instructions
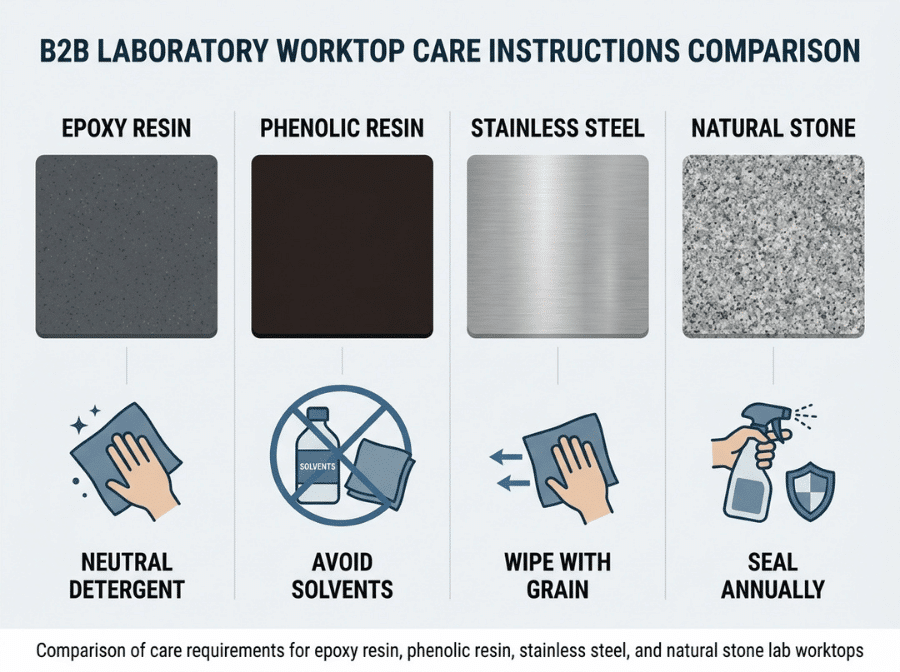
Lab bench worktops are not interchangeable in their care requirements. The cleaning agents and procedures appropriate for one material may damage another. The table below summarizes the key differences.
|
Material |
Routine Cleaning |
Avoid |
Solvent Tolerance |
Heat Resistance |
Notes |
|---|---|---|---|---|---|
|
Epoxy Resin |
Neutral detergent, damp wipe |
Strong alkalis, abrasives |
Moderate (IPA, dilute acetone) |
Good (up to ~135°C typical) |
Scratches trap contamination; can be professionally refinished |
|
Phenolic Resin |
Neutral detergent, damp wipe |
Prolonged solvent exposure, strong oxidizers |
Low–Moderate (avoid acetone) |
Moderate |
More porous than epoxy; dry promptly after wet cleaning |
|
Stainless Steel |
Neutral detergent, wipe with grain |
Chloride-based cleaners, steel wool |
Good (most common lab solvents) |
Good |
Always wipe in the direction of the grain to avoid surface scratching |
|
Natural Stone / Slate |
Dry or damp wipe; pH-neutral cleaner only |
Acidic cleaners, bleach |
Low (avoid solvents) |
Good |
Seal annually; acid spills require immediate neutralization |
How should epoxy resin lab bench worktops be maintained?
Epoxy resin worktops are among the most chemically resistant options available for general laboratory use. Routine maintenance involves neutral detergent cleaning and prompt spill removal. The surface does not require sealing under normal conditions.
Avoid placing extremely hot items directly on the surface without a heat mat, even though epoxy resin has reasonable thermal resistance. Over time, repeated thermal shock cycles—such as placing a boiling flask directly on a cold bench—can cause micro-cracking at the surface. Use hot plate mats as a precaution.
For deeper cleaning, a dilute bleach solution (1–5%) is generally tolerated for periodic disinfection, but should be rinsed off promptly and not left to dwell for extended periods.
What maintenance does phenolic resin require compared to epoxy resin?
Phenolic resin worktops are denser and harder than many alternatives, but they have somewhat lower solvent tolerance than epoxy resin. The key maintenance difference is around solvent exposure: while IPA is generally acceptable for routine disinfection, repeated use of acetone or other strong solvents can gradually degrade the surface binder.
Phenolic resin is also more susceptible to surface damage from strong oxidizing acids. Nitric acid and perchloric acid spills should be neutralized and removed immediately. Dry the surface thoroughly after wet cleaning—phenolic resin’s compressed fiber structure can absorb water at seams and cut edges if they are not properly sealed.
How do you clean and protect stainless steel lab bench worktops?
Stainless steel requires more careful cleaning technique than resin worktops because its surface is directional. Always wipe in the direction of the grain (the faint linear texture visible on the surface). Cross-grain wiping creates fine scratches that dull the finish and can harbor bacteria.
The most important substance to avoid on stainless steel is chloride. This means avoiding bleach-based cleaners, salt solutions, and any products containing hydrochloric acid. Chloride contamination can cause pitting corrosion—small but deep surface defects that are irreversible. For disinfection, use IPA or a quaternary ammonium-based product specifically formulated for stainless steel.
Dry the surface after cleaning. Persistent water pooling, especially at welds and seams, accelerates oxidation at those points.
What special care does natural stone or slate require in a laboratory setting?
Natural stone and slate worktops provide excellent heat resistance and a stable surface for precision work, but they are the most maintenance-intensive of the common worktop materials. Stone is porous and must be sealed periodically—typically once per year under normal use—using a penetrating stone sealer appropriate for the specific material.
Acidic cleaning agents and acidic reagent spills are the primary threat. Acids react with calcium carbonate in many stone types, causing immediate etching. Neutralize acid spills promptly with sodium bicarbonate solution before cleaning. Avoid all acidic cleaning products, including vinegar-based solutions and citric acid cleaners.
Hardware and Frame Maintenance
How often should leveling feet and structural supports be checked on lab benches?
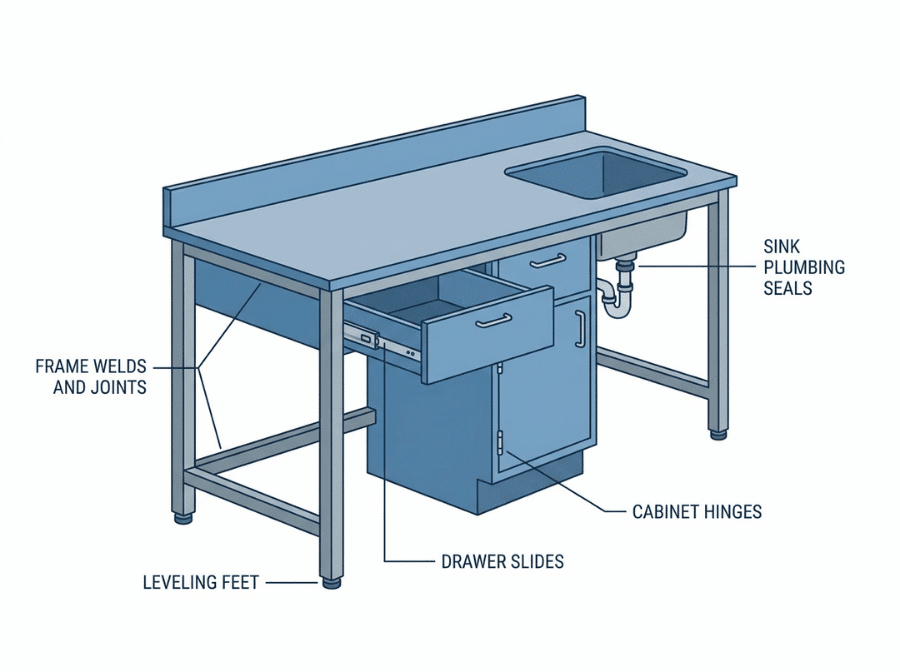
Leveling feet should be inspected quarterly. Benches that shift out of level place uneven stress on frame joints and casework, and create surface gradients that affect the accuracy of volume measurements, titrations, and balance work. Check that each leveling foot is in firm contact with the floor and that the bench does not rock. Re-level as needed.
On heavy-use benches, inspect frame welds and bolted connections for signs of stress cracking or loosening annually. Steel frames in humid environments should also be checked for surface corrosion at weld points, where the protective coating is thinnest.
What maintenance do under-bench cabinets and drawer slides require?
Drawer slides and cabinet door hinges should be lubricated with a dry lubricant (PTFE-based sprays are suitable for most laboratory environments) every 12 months, or sooner if drawers begin to stick or drag. Avoid oil-based lubricants in environments where contamination of samples is a concern.
Check that drawer stops are intact. Missing stops cause drawers to be pulled fully out of the cabinet and dropped, damaging both the slide mechanism and the floor. Inspect the cabinet interiors for chemical residues that may have leaked from stored containers—clean and decontaminate as needed, and address any storage practices that are causing regular spillage.
How should hinges and adjustable mechanisms be maintained on lab bench fittings?
Height-adjustable mechanisms and articulating arms require periodic inspection for wear in the adjustment range. Test the full range of motion and confirm that locking mechanisms hold securely at each position. Stripped threads or failed locking cams should be addressed before the mechanism is used at height, as unexpected movement can damage equipment or cause injury.
Hinges on overhead cabinet doors should be checked for alignment. Misaligned doors indicate that the hinge mounting points have shifted, which may reflect movement in the cabinet structure itself.
What should be included in a maintenance check for lab sinks and plumbing fixtures?
For lab sinks and associated plumbing, the inspection should cover:
- Drain seals: Check that cup sink and main drain seals are intact and show no signs of chemical degradation or cracking
- Faucet operation: Confirm smooth operation across the full range of motion; check for drips at the base and at connection points
- Trap integrity: Inspect P-traps or trap primers for blockages and correct sealing—a compromised trap can allow laboratory drain gases to enter the workspace
- Bench seal at sink cutout: Reseal with an appropriate chemical-resistant sealant if the joint between the worktop and sink rim shows gaps or lifting
Safety Checks and Damage Assessment
What are the early warning signs of lab bench worktop failure?
Catching damage early is significantly cheaper than dealing with full surface replacement. The following indicators warrant closer inspection and documentation:
- Surface crazing or micro-cracking: Fine networks of cracks on epoxy or phenolic resin surfaces indicate thermal or chemical stress
- Color change or opacity in a localized area: May indicate chemical attack or delamination beneath the surface
- Raised edges or delamination at seams: Water has likely penetrated the substrate
- Soft spots or flexing under load: The substrate beneath the worktop has degraded
- Rust staining on or around steel frame components: Particularly at welds, fasteners, and floor contact points
How should chemical resistance be tested periodically on lab bench surfaces?
Worktop materials degrade gradually through repeated exposure, and a surface that was fully resistant at installation may show reduced performance after years of use. A simple field test involves applying a small quantity of commonly used reagents to an inconspicuous area of the bench—such as under a service fitting or at the back edge—and observing the result after 60 minutes. Signs of staining, softening, or surface change indicate that resistance has been compromised at that location.
This test is particularly relevant after any refinishing work or repair, and should be documented as part of the maintenance record.
How should cracks, chips, and gouges in lab bench worktops be documented?
Damage documentation serves two purposes: it creates a record for procurement decisions, and it supports warranty claims if the damage is attributable to a manufacturing defect rather than use. For each area of damage, record:
- Location on the bench (use a simple diagram or photograph)
- Type of damage (crack, chip, gouge, chemical stain, delamination)
- Approximate dimensions
- Date first observed
- Any known cause
Review the damage log at each quarterly inspection and note whether damage is stable, progressing, or resolved.
Repair vs. Replace: A Decision Framework for Lab Bench Worktops
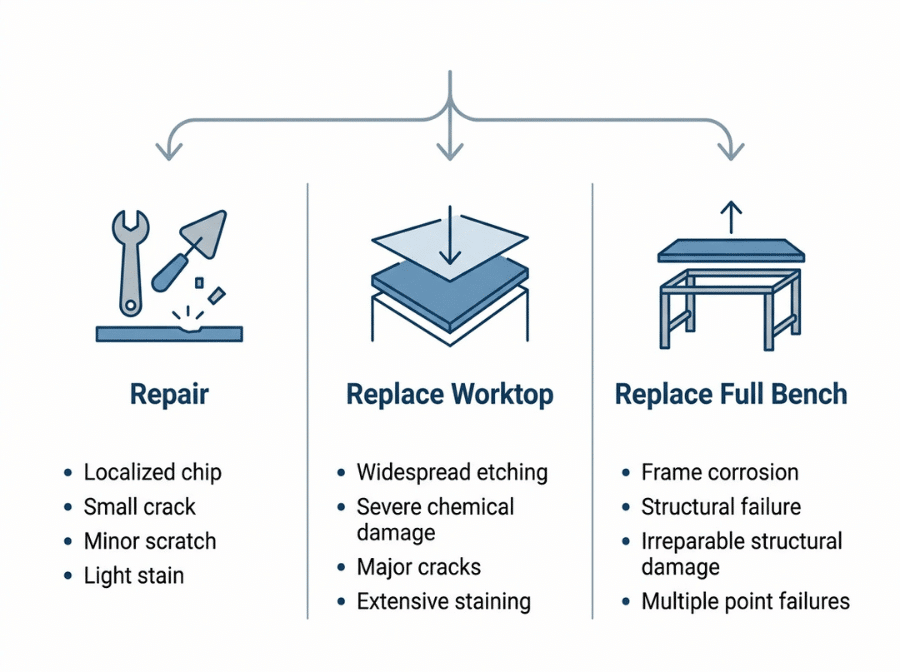
Not every damaged bench needs to be replaced. The decision depends on the nature and extent of the damage, the safety implications, and the age of the installation.
Repair is generally appropriate when:
- Damage is localized (a single chip, a contained gouge, a failed edge seal)
- The worktop material is still structurally sound across the majority of the surface
- Chemical resistance in the damaged area can be restored by resurfacing or resealing
- The bench frame and casework are in good condition
- The cost of repair is materially lower than the cost of a new worktop
Replacement should be considered when:
- Damage covers more than approximately 20–30% of the working surface
- Chemical contamination has penetrated the substrate and cannot be decontaminated
- Micro-cracking or delamination is widespread
- The bench no longer meets the safety or contamination control requirements of the work being performed
- The worktop material is no longer compatible with current reagent use in the lab
Replace the full bench (frame and worktop) when:
- The structural frame shows significant corrosion, weld failure, or deformation
- The casework has suffered water damage that cannot be remediated
- The bench is at the end of its design service life and the cost of cumulative repairs approaches the cost of a new unit
- Reconfiguration of the lab space requires a different bench layout than the existing installation can provide
When replacement is required, the material selection decision for the new worktop should reflect the current chemical inventory of the lab—not the one in place when the original bench was specified. Lab use evolves, and the new worktop should be specified accordingly. Glorylab’s lab countertops and worktops range covers epoxy resin, phenolic resin, stainless steel, ceramic, and HPL options with custom dimensions.
Lab Bench Maintenance Checklist
Use this checklist to structure maintenance intervals across your facility.
Daily
- Wipe down all bench surfaces after use with a neutral detergent solution
- Address and document any chemical spills immediately
- Dry all wet surfaces, particularly around sink cutouts and seams
Weekly
- Inspect drain seals and faucet connections at lab sinks
- Check that no standing water or pooling is present under benches or inside base cabinets
- Clean under-bench cabinet interiors if chemical residues are present
Monthly
- Inspect worktop surface condition across all benches; photograph and log any new damage
- Test drawer slides and cabinet hinges for smooth operation
- Check that all leveling feet are in firm contact with the floor
Quarterly
- Re-level all benches and tighten any loose frame fasteners
- Apply dry lubricant to all drawer slides and hinges
- Inspect frame welds and joints for corrosion or cracking
- Conduct spot chemical resistance test on heavily used worktop areas
- Review and update damage log
Annually
- Reseal natural stone or slate worktops with an appropriate penetrating sealer
- Inspect all trap assemblies and reseal sink cutouts where required
- Review reagent inventory against worktop material specifications
- Conduct formal repair-versus-replace assessment for all benches showing documented damage
Frequently Asked Questions
What is the recommended cleaning routine for laboratory bench worktops?
Wipe down bench surfaces after each experiment using a damp cloth with a neutral pH detergent (pH 6–8). Dry the surface thoroughly after cleaning. For periodic disinfection, dilute IPA (70%) is appropriate for most worktop materials. Avoid abrasive pads and strongly alkaline or acidic cleaners for routine use.
How long do lab bench worktops typically last with proper maintenance?
Service life varies by material and use intensity. Epoxy resin and phenolic resin worktops in general laboratory use typically last 15–25 years with consistent maintenance. Stainless steel worktops can exceed 20 years when protected from chloride exposure. Natural stone has an indefinite structural service life but requires annual resealing. In all cases, service life is significantly shortened by delayed spill response and inappropriate cleaning agents.
Can epoxy resin lab bench surfaces be repaired after chemical damage?
Minor surface damage—scratches, small chips, and light chemical staining—can often be addressed by professional resurfacing or filling with compatible epoxy repair compounds. Deep etching or widespread micro-cracking generally cannot be reversed by surface repair and typically indicates that worktop replacement is required for the affected area.
What is the difference between epoxy resin and phenolic resin worktops for maintenance purposes?
Epoxy resin worktops tolerate a broader range of solvents and are generally considered the more chemically resistant option for demanding laboratory environments. Phenolic resin worktops are harder and denser but have lower solvent tolerance and are more susceptible to surface damage from strong oxidizing acids. Both require neutral detergent cleaning and prompt spill response, but epoxy resin is more forgiving of occasional solvent exposure.
How do you prevent corrosion on stainless steel lab bench frames and worktops?
Prevent chloride contact—this means avoiding bleach-based cleaners, salt solutions, and any reagents containing hydrochloric acid on stainless steel surfaces. Dry the surface after cleaning and ensure no standing water accumulates at welds or seams. Inspect weld points annually for signs of pitting or surface oxidation and address early-stage corrosion with a stainless steel passivation treatment.
When is it more cost-effective to replace a lab bench than to repair it?
Replacement is generally more cost-effective when damage covers more than roughly 20–30% of the working surface, when the structural frame is significantly corroded or deformed, or when the cumulative repair cost over the next maintenance cycle approaches the cost of a new bench. If the lab’s reagent profile has changed since the original bench was specified, replacement also provides the opportunity to select a worktop material better matched to current chemical use.
How often should a full lab bench inspection be conducted?
A formal inspection—covering worktop condition, frame integrity, hardware function, and plumbing fixtures—should be conducted at minimum quarterly. High-use benches in chemistry or biology environments may warrant monthly inspection of worktop surfaces. Document all findings in a maintenance log to support procurement decisions and warranty claims.
Specify or Replace With Confidence
A structured maintenance program reduces unplanned replacement costs, extends the service life of laboratory furniture, and supports a safer working environment. The most common driver of premature worktop failure is not heavy use—it is inconsistent cleaning practice and delayed response to early damage indicators.
For facilities planning a refurbishment, expanding lab capacity, or replacing end-of-life benches, Glorylab manufactures lab benches and workstations and lab countertops and worktops across all major material types and configurations. Custom dimensions and material specifications are part of the standard production process.
Submit your project specifications or technical drawings to receive a direct response from Glorylab’s manufacturing team—no agents, no intermediaries.