A technician transferring nitric acid catches a splash across the face and eyes. From that instant, the clock matters more than anything else. Eye tissue begins to burn within seconds, and the difference between a full recovery and permanent damage often comes down to whether flushing starts immediately or thirty seconds later. There is no time to walk down a hall, no time to figure out how a fixture works, no time to wait for someone to fetch help.
That is the entire reason emergency showers and eyewash stations exist, and it’s why choosing one is not a routine purchase. A unit that looks compliant on paper but sits too far away, runs ice-cold, or blocks the injured person with a cart in the aisle is a unit that fails at the only moment it counts.
There’s a common assumption that a nearby sink or a hand-held drench hose covers the requirement. It doesn’t. A standard faucet can’t deliver the sustained, controlled flow the eyes need, can’t run hands-free for a full fifteen minutes, and doesn’t meet the performance benchmarks safety inspectors expect. This guide walks through what compliance actually demands, how to match the right equipment to your hazards, where to place it, and the mistakes that quietly undermine otherwise good intentions.
What Compliance Actually Requires
Most decisions get easier once you treat one standard as your baseline: ANSI/ISEA Z358.1. It’s the recognized benchmark for emergency showers and eyewash stations in North America, and local codes, corporate safety policies, and insurers routinely reference it. Meet it well, and most other requirements fall into place.
The performance numbers that drive your equipment choice are specific:
- Emergency showers must deliver at least 20 gallons per minute of water.
- Eyewash stations must provide at least 0.4 gallons per minute, sustained for a full 15 minutes.
- Water must be tepid — roughly 60 to 100°F (16 to 38°C). This one gets overlooked constantly, and it’s covered in depth later.
- The showerhead should sit 82 to 96 inches above the standing surface; eyewash spray heads belong 33 to 45 inches off the floor.
- Valves must activate within 1 second or less and remain open on their own, so the injured person isn’t forced to hold anything down while trying to flush both eyes.
Beyond the hardware itself, the standard sets ongoing duties. Plumbed units need a weekly activation to clear stagnant water and confirm flow, plus a documented annual inspection. If a fixture can’t be tested easily, it won’t be tested reliably — which makes serviceability part of the buying decision, not an afterthought.
On the regulatory side, OSHA 29 CFR 1910.151(c) requires suitable facilities for quick drenching or flushing wherever workers may be exposed to corrosive or injurious materials. The OSHA Laboratory Standard (29 CFR 1910.1450) reinforces this for research and teaching environments. OSHA doesn’t spell out every dimension the way ANSI does, which is exactly why building to ANSI is the most dependable way to pass an inspection: it gives you defensible, measurable performance.
One practical note before you price anything: check with your local authority having jurisdiction. Building codes and some accreditation programs add requirements on top of ANSI, and it’s cheaper to know that upfront than to retrofit later.
Equipment Types and How to Choose
The right fixture depends less on catalog categories and more on two questions: what can your building actually supply, and what does your hazard demand? Work through the options with those in mind.
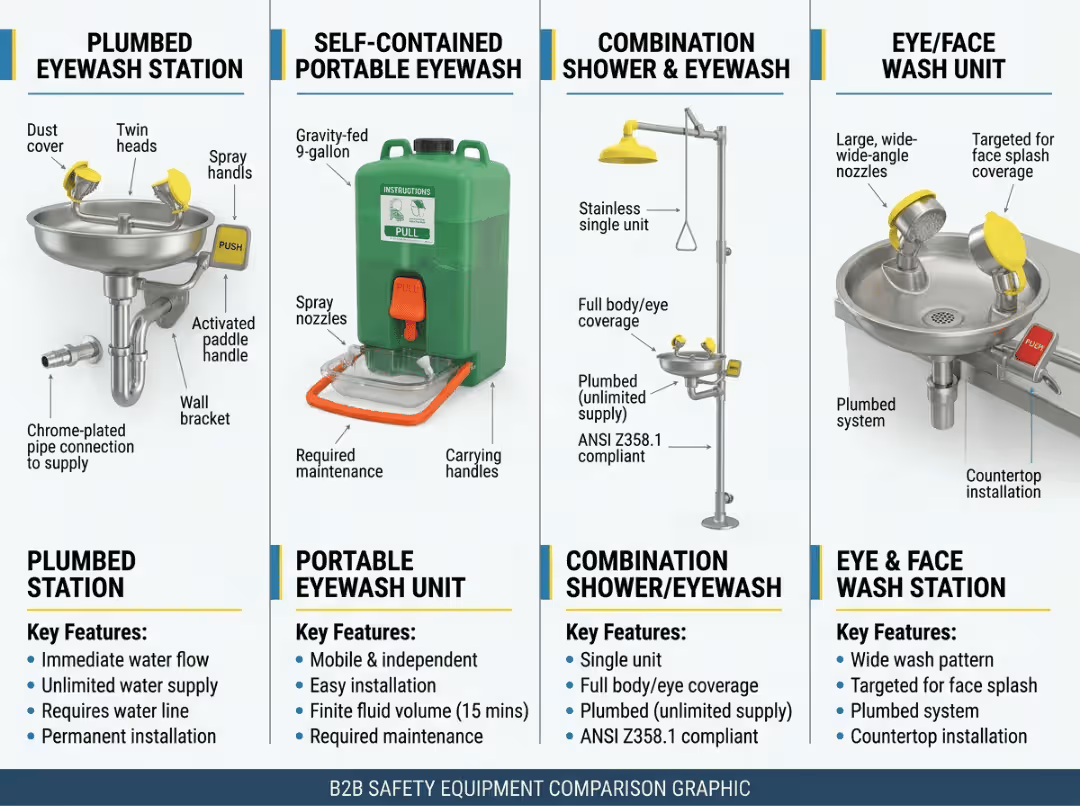
Plumbed vs. Self-Contained
Plumbed units connect to the building’s continuous water supply. For a fixed lab with reliable pressure, this is almost always the correct choice. Flush time is unlimited, per-use cost is negligible, and the construction is built to last. The trade-off is infrastructure: you need dedicated plumbing, a drainage plan, and a consistent source of tepid water.
Self-contained and portable units carry their own water in a sealed reservoir. Their legitimate role is narrow but real — temporary labs, trailers, remote sampling points, or spaces where new plumbing simply isn’t feasible. They come with genuine burdens: limited flush volume, scheduled refilling and sanitation, and water-quality risk if the tank is neglected.
Here’s the judgment call that trips people up. A portable unit is a bridge, not a destination. If your lab handles corrosives every day at a fixed bench, a portable eyewash is not a substitute for a plumbed station — it’s a stopgap until proper plumbing goes in. Treating it as permanent is one of the more common compliance failures inspectors flag.
Combination, Eyewash-Only, and Eye/Face Wash
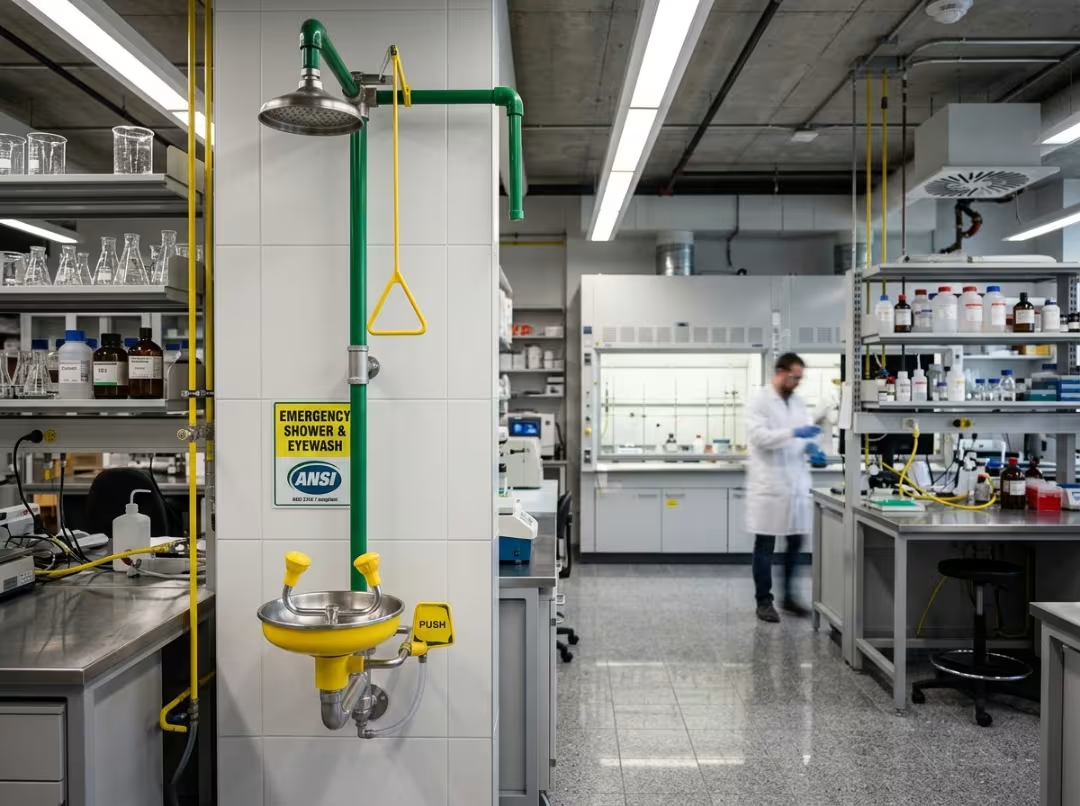
Combination shower and eyewash stations combine full-body drenching and eye or face flushing in a single footprint. When a worker faces both overhead splash and eye-level hazards — think decanting concentrated acids at an open bench — a combination unit is usually the right answer. Each component still has to meet its own flow and temperature spec, even when both run at once.
Eyewash-only units deliver a gentle, low-flow rinse aimed at the eyes. They suit incidental splash risks where exposure is limited to the eyes and the chemistry isn’t aggressive.
Eye/face wash units widen the spray pattern and increase flow to flush the whole face, not just the eyes. When your hazard assessment shows a realistic risk of larger surface exposure — a beaker of caustic tipping toward someone’s face — the eye/face wash is the stronger specification.
The practical rule: let the worst credible exposure drive the choice. A lab where the realistic accident is a full-face caustic splash should not be equipped with a minimal eyewash just because it’s cheaper and smaller. Match the coverage to the injury you’re actually protecting against.
Placement and Hazard Assessment
The best fixture in the catalog underperforms if it’s in the wrong spot. Placement starts with understanding your hazards, then translates that into reachable, unobstructed locations.
Run the Hazard Assessment First
Before you shortlist any equipment, pull the Safety Data Sheets for every chemical in the lab and flag the ones that call for immediate flushing on skin or eye contact. That list tells you what you’re protecting against and where. A room full of dilute buffers has very different needs than a bench where hydrofluoric acid gets handled.
Bring the right people into this review — a lab manager who knows the daily workflow, an environmental health and safety officer who knows the standards, and a facilities engineer who knows what the building can deliver. Decisions made by one person in isolation are where gaps appear.
Reachable in 10 Seconds, With Nothing in the Way
ANSI’s travel rule states that a fixture must be reachable within 10 seconds of the hazard, which translates to roughly 55 feet under typical conditions. The critical detail: that’s an unobstructed path, not a straight line on a floor plan. Doors, corners, steps, and cluttered aisles all eat into those ten seconds. A person who can’t see clearly after a splash needs to move toward the station almost by instinct, without navigating around a cart or squeezing past a chair.
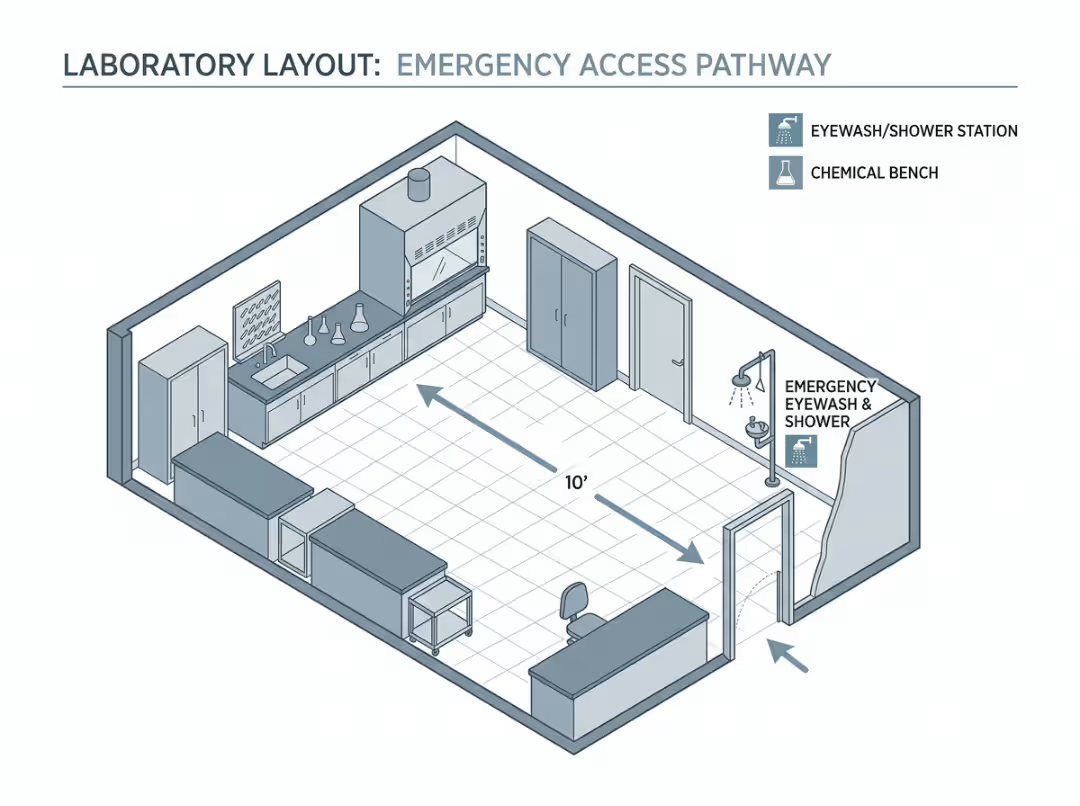
Place units on the same floor as the work, and don’t tuck them inside a chemical storage room that might be unsafe to enter during the very incident you’re responding to.
Put Stations Where the Chemistry Actually Happens
Hazards aren’t confined to where chemicals get mixed. Decanting, transferring, and disposal are frequent points of exposure and deserve their own coverage. In a larger or multi-room facility, a single central station rarely serves everyone within the ten-second window — map your fixtures to actual work zones, not building symmetry.
This is where emergency fixtures intersect with the rest of your lab design. Positioning a station relative to the bench where corrosives are handled should be part of planning your lab benches and workstations, not a detail bolted on afterward. Keep the fixture near an emergency exit for visibility and egress, but never in the doorway where it blocks the route out.
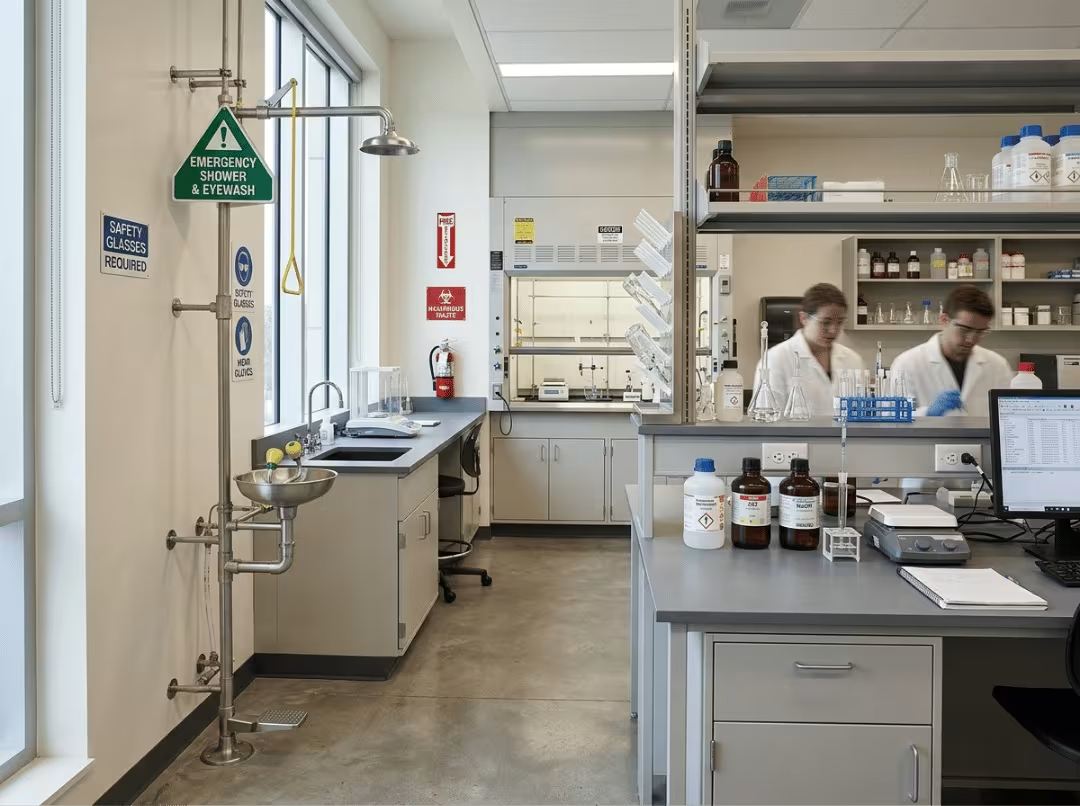
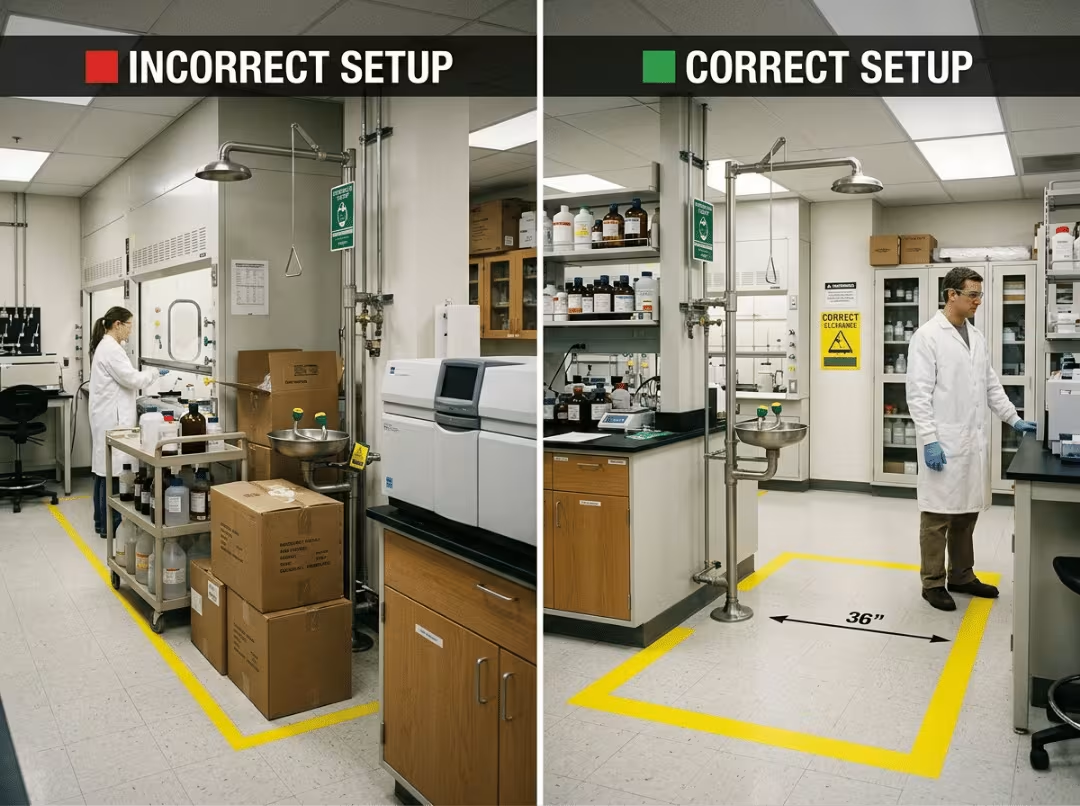
Finally, keep the footprint clear and mark it well. Bright signage and a light above the unit help people find it during a smoke or power outage, when normal wayfinding disappears.
Water Supply, Temperature, and Drainage
This is the section most buyers underestimate, and it’s where quietly non-compliant installations are born. Getting the equipment right means nothing if the water behind it is cold, weak, or has nowhere to go.
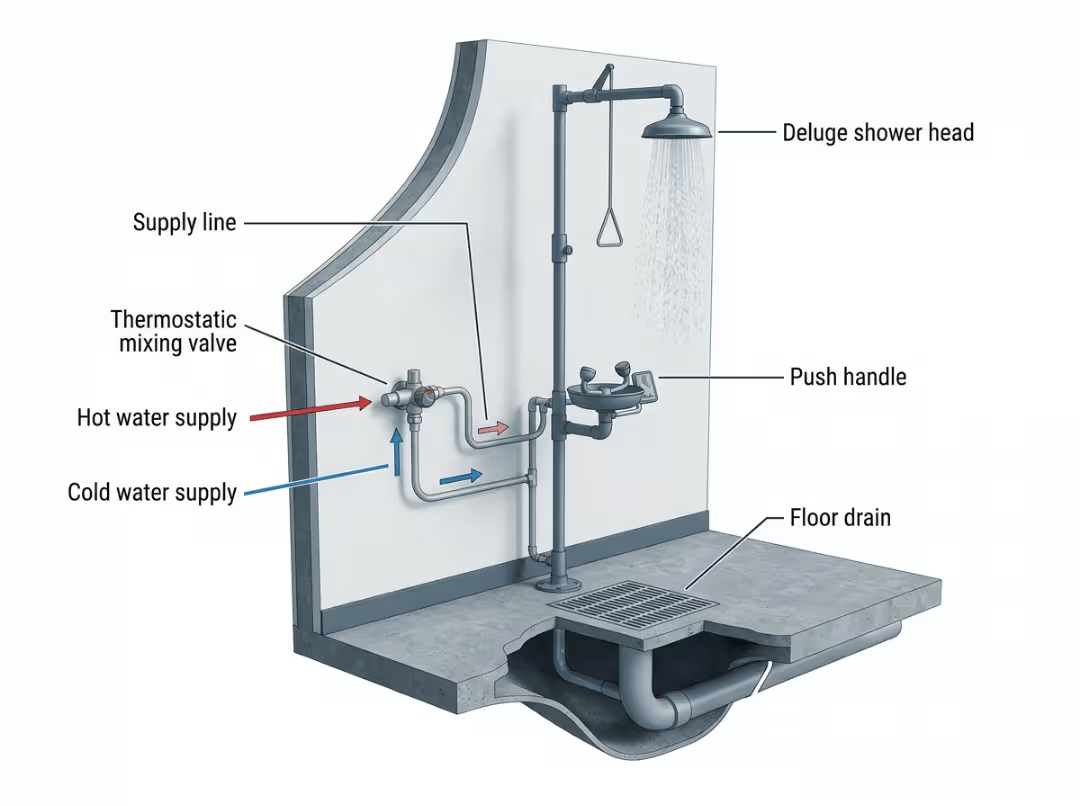
Tepid Water Is Not Optional
Tepid means roughly 60 to 100°F, and the reason is behavioral as much as physiological. Water that’s too cold shocks the user and cuts the flush short — nobody stands under an icy stream for fifteen minutes, which is exactly how long a serious exposure needs. Water that’s too hot burns injured tissue and can drive chemicals deeper. Either extreme defeats the purpose.
There are three common ways to deliver tepid water reliably:
- Thermostatic mixing valves blend the building’s hot and cold supply to a controlled temperature at the fixture.
- Recirculating loops keep warm water moving right up to the station instead of letting it cool in a long, static pipe run.
- Point-of-use electric heaters serve locations without practical access to a recirculating warm supply.
Watch for the seasonal trap. An eyewash fed by cold water off a secondary line might pass a quick test on a warm afternoon and then fail badly in winter, when incoming water temperature drops. Verify tepid performance under worst-case conditions, not just on the day of installation.
Verify Flow Under Real Conditions
The ANSI flow rates — 20 gpm for a shower, 0.4 gpm for an eyewash — have to be achievable at the actual fixture, not just on the spec sheet. Ask facilities to confirm line pressure at the intended location while other equipment is running. An autoclave or glasswasher cycling on can lower the pressure enough to starve a station. A lab with several fixtures may need a dedicated line or a pressure booster to keep every unit in compliance simultaneously.
Emergency fixtures are one demand on a shared water system that also feeds sinks, faucets, and process equipment. Thinking about them alongside your broader wet area and water point planning helps you avoid the surprise of a fixture that tests fine on its own but underperforms when the lab is busy.
Plan for the Water That Comes Back Down
Run the arithmetic on a full shower activation: 20 gallons per minute for 15 minutes is 300 gallons. That volume has to go somewhere, and “the floor” is not a plan. Floor drains, trench drains, or containment sumps all work, but the drain must be sized for the total flow from every fixture that could run at once.
If the lab handles hazardous chemicals, the rinse water may be contaminated, which brings local sewer discharge rules into play. A neutralization tank or a dedicated chemical waste line may be required. Skipping drainage is the mistake that floods a lab the first time someone actually pulls the handle — and it’s far more expensive to fix after the walls and benches are in.
Common Selection Mistakes
The failures in this category repeat across labs, and they’re easier to avoid when you see them as scenarios rather than a checklist.
A facility buys a shower rated at 20 gpm and considers the box checked. Nobody measures pressure at the fixture while the glasswasher is running, and during an actual incident, the flow sputters below spec. The unit met the standard on paper and failed in practice — the gap was never the equipment; it was the water behind it.
A lab in a cold climate installs a plumbed eyewash off the nearest cold line to save on plumbing. It tests fine in September. By January, the water is frigid, users can’t tolerate a full flush, and the fix is a costly mixing valve or recirculation retrofit that would have been cheap to design in from the start.
A station is placed at the correct distance on the floor plan, but over time, a storage cart, a rolling cabinet, and a stack of boxes accumulate in the aisle. The ten-second path is now an obstacle course, and the one time it matters, an injured worker has to fight through it half-blind.
A shower is specified without a floor drain because the budget was tight and “it’ll rarely run.” The first real activation dumps hundreds of gallons across the lab floor, into adjacent rooms, and around expensive equipment. The saved drain cost is dwarfed by the cleanup and downtime.
A portable eyewash gets placed at a permanent corrosive-handling bench as a quick solution, and then simply stays. Refills lapse, water quality degrades, and a stopgap meant for a week becomes the lab’s frontline eye protection — until an inspector or an incident exposes it.
Every one of these traces back to the same root: treating an emergency fixture as a product to buy rather than a system to design around specific hazards, real water conditions, and the space people actually move through.
Frequently Asked Questions
What’s the difference between an eyewash and an eye/face wash station?
An eyewash delivers a gentle, low-flow rinse focused on the eyes, suited to incidental eye splashes. An eye/face wash uses a wider spray pattern and higher flow to flush the entire face and eyes. When your hazard assessment shows a realistic risk of larger facial exposure — not just a droplet in the eye — the eye/face wash is the appropriate choice.
Can a portable, self-contained eyewash replace a plumbed unit under OSHA?
For permanent, fixed hazards, no. Portable units are appropriate for temporary locations, remote areas, or spaces where plumbing genuinely isn’t feasible, and they can serve as a temporary measure while permanent plumbing is installed. Where corrosives are handled routinely at a fixed location, a plumbed station is the reliable, defensible solution.
How often do emergency showers and eyewash stations need to be tested?
Plumbed units should be activated weekly to flush out stagnant water and verify proper flow, temperature, and functionality. On top of that, a documented annual inspection verifies full compliance with ANSI performance requirements. Self-contained units follow the manufacturer’s schedule for inspection, refilling, and sanitation.
How much water does a safety shower use in a full flush?
At the ANSI minimum of 20 gallons per minute for 15 minutes, a single shower activation uses about 300 gallons. That figure drives your drainage planning — every fixture that could run at once needs a drain sized to handle the combined flow.
What does “tepid water” mean, and why does it matter?
Tepid water is roughly 60 to 100°F. It matters because water outside that range undermines the flush: too cold and the user won’t tolerate a full 15 minutes; too hot and it injures already-damaged tissue. Delivering tepid water usually requires a thermostatic mixing valve, a recirculating loop, or a point-of-use heater.
How far can an emergency station be from the hazard?
The fixture must be reachable within about 10 seconds, which is roughly 55 feet under typical conditions. Critically, that’s measured along an unobstructed path — doors, turns, and clutter all reduce the effective distance. Place stations on the same floor as the work and keep the route to them clear.
Do I really need a floor drain under every shower?
You need a plan for the water, and a floor drain is the most common solution. The drain must be sized for the total simultaneous flow, and in labs handling hazardous chemicals, the rinse water may require a neutralization tank or chemical waste line to meet local discharge rules. Skipping drainage risks flooding the lab on first use.
Is a combination shower and eyewash better than two separate units?
It depends on the hazard. A combination unit is efficient and correct where workers face both overhead and eye-level splash risks in the same area. Where only one type of exposure is credible, a dedicated unit sized to that hazard can be the better fit. Let the exposure profile decide.
Getting the Decision Right
An emergency shower or eyewash station is a long-term safety investment, and the right unit is the one that is matched to your specific hazards, your building’s actual water conditions, and the way people actually move through the space. The process is straightforward when you follow this order: review the standards, assess your hazards with SDSs in hand, choose the fixture type your exposures require, confirm tepid water and adequate flow under real conditions, plan drainage, and set up a documented testing routine.
Start with a hazard audit of every chemical you handle and where. Bring your EHS team and a licensed plumber with experience in emergency fixtures to the site review before you commit to anything. And don’t accept an installed unit until it has been properly commissioned — flow, temperature, height, and reachability all verified, and staff trained on how to use it.
If you’re specifying safety fixtures as part of a new build or a refit, planning them alongside your broader laboratory furniture and infrastructure — benches, water points, drainage, and traffic flow — is what turns a compliant purchase into a genuinely safe lab. The goal isn’t just to pass an inspection. It’s to make sure that in the first critical seconds of an incident, the right help is exactly where it needs to be.